• Photography
  • About
  • Blog

Eric Danley

  • Photography
  • About
  • Blog

Safari General Packing Postmortum

Our packing List

Our packing List

When it come to travel, a African safari can be pretty complicated, and I spent a lot of time working with my wife to refine out packing list. We were taking a bush plane back from the Northern Serengeti for Kilimanjaro Airport (JRO) which meant that we have a 20 kg per person total weight limit and that weight limit had to include camera gear, electronics, and both “checked” and “hand” (carry-on) baggage. We were actually fortunate because an earlier change in our flight plans increased our weight limit by 5 kg per person as it had originally been 15 kg per person. We made it under the limits at about 17 kg per person (including about 12 kg of camera and electronic gear), but would have struggled if we had to meet the 15 kg limit.

In this post I want to walk through the packing list and comment on what we did or didn’t need to pack. I’ve already done this exercise for electronics in another post.

Clothes

We were in Africa for 8 nights, with 6 full days of game drives, plus 4 days of transiting including a couple in Doha, Qatar for a total of 12 days of travel. We stayed at a combination of Hotels, Lodges, Permanent Tented Camps, and Mobile Tented Camps throughout that time. Generally, we were always on the move from place to place and only stayed two nights in a row at a couple of locations.

We did try to economize here and our general setup per person was:

  • 3 Merino Wool T-Shirts

  • 2 Safari Company BugTech Shirts

  • 1 Safari Company Fleece Jacket

  • 2 Pairs of Hiking Pants (Pre-treated with Sawyer Permethrin)

  • 1 Dressier outfit (Dress for the girls, Button down shirt for me)

  • PJs

  • Swimsuit

  • 8 pairs of socks

  • 12 pairs of underwear

  • Safari Hat

  • Flip Flops

Most advice relating to safari encourages you to take advantage of camp laundry to help reduce what you need to pack, but unfortunately that only works if you are staying at a location at least two-nights in a row. We planned on doing this towards the end of the trip, but unfortunately where it would have been most convenient in the middle of the trip we weren’t able to do laundry. One thing that is important to note is that at the camps where laundry is washed by hand they likely won’t wash “women’s smalls” (underwear) though our experience was the would wash mens.

Our general approach here wasn’t bad, but we could have economized further to save some weight by reducing to two merino wool t-shirts per person, fewer pairs of socks (taking advantage of laundry), and not packing PJs. We did use the dressier clothes when we were at the lodge, and in Doha. Our itinerary didn’t leave much opportunity for swimming (though we did swim once at our camp in Tarangire), but our next trip will be sure to leave more time for that. We originally thought the flip-flops would be for the showers, but that wasn’t necessary, though they would still be useful for swimming. And while we don’t usually wear hats and felt a little silly in them, they were absolutely valuable on game drives.

Revised Packing list:

  • 2 Merino Wool T-Shirts

  • 2 Safari Company BugTech Shirts

  • 1 Safari Company Fleece Jacket

  • 2 Pairs of Hiking Pants (Pre-treated with Sawyer Permethrin)

  • 1 Dressier outfit (Dress for the girls, Button down shirt for me)

  • PJs (As needed)

  • Swimsuit

  • 4 pairs of socks

  • 12 pairs of underwear

  • Safari Hat

  • Flip Flops

Per Person reduction: 1 Merino Wool T-Shirt, 4 pairs of socks, PJs

Toiletries:

We packed a little medicine cabinet in addition to things like toothbrush, razors, contacts, etc. Little of the medicine was used, but not having access to it would have been a risk. We probably could have some quantity reductions here, for example only pack one tide-stick and hand sanitizer bottle instead of two. We also packed a fair amount of emergency toilet supplies which aside from a few sheets of toilet paper and the “p-styles” nothing was used as the parks actually have pretty good bathroom facilities. One last minute addition was extremely large wet-wipes for cleaning in lieu of a shower (intended for backpacking) and we’re actually glad we brought these as there were times where we were just exhausted and needed to clean up but didn’t want to mess with the far-from-glamorous shower facilities at the mobile camps.

Reductions: Bring a lower quantity of items that may or may not be needed, leave most of the emergency toilet supplies at home.

Other:

We had a trip to Barcelona recently where my daughter, 8 at the time, basically didn’t eat anything for days and we eventually had to find a Burger King just to get her some food she recognized. Given the lack of Burger King in the Tanzanian bush we opted to pack a fair amount of snacks. Food quality and selection generally turned out not to be a problem but a good portion of the snacks did get eaten. The great thing about snacks though is that they’re consumable and thus reduce weight over time, and can be left behind in a pinch. Although technically a snack I want to call out hard candy (in our case Jolly Ranchers) these turned out to be super valuable when the dust was exceptionally bad to keep coughs down. A couple other call outs: for some reason I thought packing Oral Rehydration Salts would be useful to help combat jet lag and in case anyone had significant digestive issues. Well these are absolutely disgusting and really are for an emergency only. Don’t pack these. Finally, we packed a pretty significant First Aid kit that we never used. The need for this is probably driven by your itinerary but we didn’t use it at all. Next time we’ll bring a much smaller first-aid kit.

Reductions: Oral Rehydration Salts, Smaller First-Aid Kit

UPDATE:

A couple other things I wanted to comment on:

  • Every place we stayed provided soap and shampoo, only the lodge provided conditioner. We packed soap and shampoo at the suggestion of our travel agent but this was unnecessary.

  • We packed 3 headlamps, 2 flashlights, and a super small LED lantern. The number of items we brought were excessive but the need to pack extra lighting was real. My wife preferred the headlamp, my daughter the lantern, and I either used a flashlight or nothing. Next trip we can pack fewer of these items.

Given the above, along with the reductions in electronics, I think we’d easily fit under the standard 15 kg weight limit and generally have an easier time of things.

tags: safari, packing, travel
categories: Safari
Friday 07.05.19
Posted by Eric Danley
 

Packing Electronics & Photography Gear for Safari

Baby elephants playing

Choosing what to bring on safari can be complicated, especially if your safari includes flights on a bush plane where weight is severely limited. Many of the flight providers in northern Tanzania only allow 15 kg of luggage per person, and that includes both your “checked bag” and your carry on item. There may be the opportunity to buy additional weight allowance at the airport, but it’s not something you can count on. This weight limit forces you to be selective about the gear you bring and in this post I want to share what I brought on my recent safari as well as comment whether I would bring the items along next time.

Main Camera Kit:

  • Sony A7R III w/Sony 100 - 400 f4.5 - 5.6 GM Lens & Sony 1.4x Teleconverter

  • Sony A7 III w/Sony 24 - 105 f4 G Lens

  • Sony 16 - 35 f4 T* Lens

The dual Sony camera approach worked exceptionally well. I used the A7 III for landscapes or when the animals were particularly close to the vehicle, or when they were moderately close but I wanted to include the animal’s environment within the shot. The A7R III's effective range of 140 - 560 mm allowed me to get tight on many animals, and zoom in reasonably on the birds or animals farther away. The 16-35 was essentially never used because I didn’t want to switch lenses (the dust was often bad).

Next time, I’ll leave behind the 16-35 mm lens and I’d probably opt for Sony’s new 200 - 600 mm f5.6 - 6.3 G lens instead of the 100 - 400 giving me slightly better reach and presumably better AF performance without the teleconverter. These changes would be weight neutral. Should Sony release an crop sensor camera with the ergonomics of the current A7 line I would probably bring this rather than the A7R III due to the extra reach and pixel density.

Verdict:

Bring:

  • Sony A7 III w/Sony 24 - 105 f4 G Lens

Change:

  • Sony A7R III w/Sony 100 - 400 f4.5 - 5.6 GM Lens & Sony 1.4x Teleconverter

Leave Behind:

  • Sony 16 - 35 f4 T* Lens

SafariSack Beanbag

SafariSack Beanbag

Main Camera Accessories:

  • 6 Extra Batteries (4 OEM, 2 RavPower)

  • 6 Microfiber Cleaning Cloths

  • Peak Design Cuff

  • Peak Design Slide Lite

  • Cleaning Kit (Zeiss Lens Wipes, Mini Dust Rocket)

  • RavPower USB Battery Charger

  • Watson Compact Battery Charger

  • Genesis SafariSack

  • A LOT of Memory Cards

  • 77 mm Circular Polarizer

  • 2x & 4x Breakthrough Photography ND Filters

Everything on here was pretty reasonable, and the only changes I’d make were leaving behind the Peak Design Cuff which I never used due to switching between camera bodies and perhaps only bring the 4x ND filter, leaving the others behind. I only used the 4x ND filter while shooting video on the A7III during the middle of the day and I typically never used a polarizing filter. I did try using it while shooting the car windows during drives from park to park but the alignment of the car didn’t make this ideal. It seems like a lot of batteries, and it was, but as electricity access was inconsistent I did find myself down to my last two batteries at one point.

Our safari company did provide two basic bean bags for camera stabilization. I didn’t know this in advance, but still would bring my SafariSack because I greatly preferred it to the ones they provided. Next time I might actually bring two.

Verdict:

Bring:

  • 6 Extra Batteries (4 OEM, 2 RavPower) in a Think Tank Case

  • 6 Microfiber Cleaning Cloths

  • Peak Design Slide Lite

  • Cleaning Kit (Zeiss Lens Wipes, Mini Dust Rocket)

  • RavPower USB Battery Charger

  • Watson Compact Battery Charger

  • Genesis SafariSack

  • A LOT of Memory Cards in a Think Tank Pocket Rocket Secure

  • 4x Breakthrough Photography ND Filters

Leave Behind:

  • Peak Design Cuff

  • 77 mm Circular Polarizer

  • 2x Breakthrough Photography ND Filter

Add:

  • Second Genesis SafariSack

Video Gear:

  • Rylo 360° Camera

  • Rylo Invisible Grip

  • Rylo Action Case

  • Rylo Everyday Case

  • Peak Design POV Kit

  • GoPro Suction Mount

  • GoPro Clamp Mount

  • 2 Rylo Batteries

  • Rylo Charger

  • microSDXC Cards

  • Shure MV88+ Microphone Kit (Microphone, Smartphone Clamp, Tripod)

  • Dual Cold-Shoe Adapter

  • LED Light

  • RODE VideoMic Pro w/Windscreen

  • RODE Lavalier Mic w/Windscreen

Alright, this is where I really overpacked. I’ve never been heavily into video but am envious of those amazing travel videos I see on YouTube. I haven’t gone through my footage yet, but I did take a lot with the Rylo and some with my A7s. We intended to have my daughter extend her YouTube video series with daily reports using the Shure MV88+ kit, but that plan didn’t really come to fruition. Next trip I would greatly condense this kit to save weight and space. 

Quick Note on the GoPro Clamp mount: This is the OEM mount, but it failed on my sending my Rylo flying into the side of the dirt road. Fortunately this happened without any wildlife around and our guide was able to stop the video and pick it up. Had their been lions or baboons around, I very likely could have permanently lost the Rylo and the footage it contained. I think it was all the dust that caused it to get a bad mount but I didn’t really have an opportunity to investigate and just didn’t use it the rest of the trip.

Verdict:

Bring:

  • Rylo 360° Camera

  • Rylo Invisible Grip

  • Rylo Action Case

  • 2 Rylo Batteries

  • Rylo Charger

  • microSDXC Cards

Maybe:

  • Shure MV88+ Microphone Kit (Microphone, Smartphone Clamp, Tripod)

  • Dual Cold-Shoe Adapter

  • LED Light

Leave Behind:

  • Peak Design POV Kit

  • GoPro Suction Mount

  • GoPro Clamp Mount

  • RODE VideoMic Pro w/Windscreen

  • RODE Lavalier Mic w/Windscreen

Data Backup:

  • Lacie 4TB Rugged USB-C Drive

  • G-technology 1TB USB-C G-Drive

  • Western Digital 500 GB My Passport Wireless SSD

I’ve been burned by having inadequate backup processes in place previously and was determined to well prepared for any possibility with this trip. My cameras were set to write to both SD cards simultaneously giving me real-time backup as I shot the phots, each night then I downloaded my photos to my Laptop and copied them to the Lacie and G-Technology drives then the drives were stored in two different locations: the G-Drive with my electronics gear and the Lacie thrown in the duffle with our clothes.Cloud backup was not possible due to the low availability of internet bandwidth. My intent with the My Passport was to do an occasional laptop-less backup in the field during the day, but that didn’t happen. Ultimately this meant that I was protected against an SD card failure, a laptop failure, and partial theft.

Thanks to improvements coming in iPadOS 13 around external file support, I think I’ll be able to leave my laptop behind on future trips. What this means for hard drives, I’m not sure yet. I’d prefer to go with iPad Pro + Lacie Rugged, but it may end up being iPad Pro + My Passport. Either way I think SD Card redundancy + iPad Pro + External HD will give me my three location backup protection needed for good backup and require a smaller footprint. I took about 300 GB of photos and video, so the MyPassport would have been enough in this situation though I had two unproductive mornings so the total amount of data generated would have been higher under ideal circumstances.

Verdict (Move to iPad-centric workflow with iPadOS 13):

Bring:

  • Lacie 4TB Rugged USB-C Drive OR Western Digital 500 GB My Passport Wireless SSD

Leave Behind:

  • G-technology 1TB USB-C G-Drive

  • Lacie 4TB Rugged USB-C Drive OR Western Digital 500 GB My Passport Wireless SSD

Other Electronics:

  • MacBook Pro 13 (2016)

  • iPad Pro 10.5”

  • Apple Pencil

  • Beats Studio Wireless Headphones

  • Kindle Paperwhite

  • HyperJuice USB-C Battery Pack

  • Global Mifi

  • Cables

  • International Adapters

  • Anker USB-C 60W 5 Port charger

  • Car Charger

Nothing totally crazy on this list, but as I mentioned above I’m hopeful that the external file access improvements in iPadOS 13 will allow me to go iPad only on most trips. (in case you’re not aware, iPadOS 13 will allow you to import RAW files directly from your SD card into Lightroom CC instead of needing to first import into the Photos app). The Global Mifi was great when it worked, but many areas in the National Parks didn’t have data coverage making this less useful. The Car Charger wasn’t needed because our Safari Truck had two regular AC outlets (international outlets like you find on airplanes). Finally, make sure you really think about the cables you need as I ended up having to buy an additional Micro USB cable while I was down there.

Verdict:

Bring:

  • iPad Pro 10.5”

  • Apple Pencil

  • Beats Studio Wireless Headphones

  • Kindle Paperwhite

  • HyperJuice USB-C Battery Pack

  • Global Mifi

  • Lightning and Micro USB Cables

  • International Adapters

  • Anker USB-C 60W 5 Port charger

Leave Behind:

  • MacBook Pro 13 (2016)

  • Car Charger

Add:

  • Extra Cables

Camera/Organizer Bags:

  • Peak Design Everyday Backpack 20L

  • Peak Design Field Pouch

  • f-stop Accessory Pouch - Medium

  • Think Tank Cable Management 30 v2.0 Bag

  • BAGSMART Electronics Travel Organizer Bag

The Peak Design Everyday Backpack is great, and I’m a big fan but weight restrictions were a huge factor here, and it was actually our international airline, Qatar Airways, which posed the biggest challenge. Their policy requires that Hand Baggage (we call it Carry-on Baggage in the US) weigh no more than 7 kg (15.4 pounds) and there are reports of their checking baggage weights when you board the plane though this never happened to us. My main camera kit was 10 pounds on its own so storing everything if my backpack wasn’t doable for air travel at least.

Ultimately I used the backpack for my cameras, placed my iPad, Kindle, and MacBook in the carry-ons of other family members and used the Peak Design Field pouch with the Peak Design Slide Lite camera strap to hold my lithium-ion batteries. Audio equipment went in the Think Tank bag, chargers and cables went in the F-Stop pouch, and finally everything else went in the bag smart bag. The field pouch went into the Peak Design backpack so that it could be removed and worn as a personal item (man purse) in the event they were weighing backpacks.  The f-stop pouch and BAGSMART bag went into checked luggage.

Reducing any of these would be dependent on reducing other gear. Based on the items I said to leave behind in this post I could likely condense the remaining contest of the BAGSMART Bag and the F-Stop Bag into the Think Tank Cable Management bag.

Verdict:

Bring:

  • Peak Design Everyday Backpack 20L

  • Peak Design Field Pouch

  • Think Tank Cable Management 30 v2.0 Bag

Leave Behind:

  • BAGSMART Electronics Travel Organizer Bag

  • f-stop Accessory Pouch - Medium

Peak Design Everyday Backpack strapped to seat in car

Peak Design Everyday Backpack strapped to seat in car

One final note on bags, I was able to use a backpack strap to secure my Everyday Backpack sideways on a seat while driving around on game drives. This gave me a secure place to store my cameras while one or both weren’t in use. Prior to putting this solution in place I did have a couple of situations where a bump would result with a camera falling off a seat and landing on the ground. 

tags: photography, gear, electronics, accessories
categories: Safari
Tuesday 07.02.19
Posted by Eric Danley
 

REI Chicagoland Rental Rates

I couldn't find this online, so here is the rental information for Chicagoland REI stores as of July 29, 2013. Although I got this at the Oak Brook REI, these prices are good at all 4 Chicagoland locations according to the brochure. Not all items are available in all stores, check out their website for which stores rent which cateogies. Where specific products are listed, those are the options at the Oak Brook Store. Other locations may have different offerings.

Item (First Day/Additional Day, REI member price in bold) 

Backpacks:

Internal Frame ($15/$6, $20/$8)
Junior - Ext Frame ($10/$4, $15/6)

Tents w/Footprint:

2 Person, 3 Season — REI Half Dome 2 ($15/$6, $10/$8)
3 Person, 3 Season — REI Quarter Dome 3 ($20/$8, $25/$10)
3 Person, 4 Season ($20/$8, $25/$10)
4 Person Family Camping Tent, 3 Season — REI Base Camp 4 ($25/$10, $32/$12)
6 Person Family Camping Tent, 3 Season ($35/$14, $43/$16)

Sleeping Bags:

3-Season Bag ($15/$6, $20/$8)
Self-Inflating Sleeping Pad ($10/$4, $15/$6)

Stoves:

One Burner ($5/$2, $8/$4)
Two Burner ($10/$4, $15/$6)

Paddling:

Canoe — Mad River Adventure 16 ($45/$18, $60/$24)
Perception Tribute 12 ($45/$18, $60/24)
W/S Pungo 120 ($45/$18, $60/24)
w/S Tarpon 120 ($45/$18, $60/24)
Old Town Vapor 10 ($45/$18, $60/24)
Perception Prodigy II Tandem ($65/$26, $80/$32)
W/S Tsumami 145 w. Rudder ($65/$26, $80/$32)
Stand Up Paddleboard ($60/$24, $80/$30)
PFDs ($6/$2, $8/$4)
Paddles ($6/$2, $8/$4) 

tags: camping, outdoors
categories: Misc
Monday 07.29.13
Posted by Eric Danley
 

883 a day

I released Mouse Trivia in March of 2011 with the typical high expectations of an indie app developer, especially one that had really no experience in the industry. This was my first iOS game and the first app where I tried the whole free with ads thing. Apple made it really easy with iAd and I just dropped the ad unit on my .nib file, added a few lines of code and boom, that was it. Needless to say the App hasn't made me rich, but it's truly shattered my expectations.

The first iteration of the app was pretty simple, with a not-so-good user interface. It boasted over 200 questions that I had written myself through hours of research on wikipedia. Reviews were along the lines of, "Good start. Not enough questions."

The next few versions increased the database to over 1,200 questions, redid the UI, and added a new game mode. Over time I released specialized versions of the app focused on Pixar, Villains, Tangled, etc. Now I get reviews that range from, "I love this app, its perfect for passing the time in line for Splash Mountain" — have they never heard of Fastpass? ;-) — to "God there are too many questions that I don't know the answers to. It never ends."

With 8 apps available on the store the Mouse Trivia series has reached an average of 883 downloads a day, totaling nearly 450,000 downloads. Wow. If that pace stays steady it'll reach half a million in just under two months.

There is no way for me to know how much time has been spent in the app, but I think its safe to say that many many hours of enjoyment have come from these apps, and thats truly humbling to think about.

Thank you to everyone that has downloaded Mouse Trivia.

Tuesday 08.14.12
Posted by Eric Danley
 

1:1 iPad Web Filtering @home

A few weeks ago we finally made the step of sending the iPads and MacBook Airs home with students, and truly launched our 1:1 research project. From our other very limited iPod touch deployments we knew that teachers and parents would be concerned with their students having unfiltered wifi access outside of school. Legally, we have no obligation to provide web filtering at home (CIPA requires filtering of devices/networks paid using federal money and these are not) however, our repsonsibility as educators go well beyond legal requirements and it's important to us that our parents are comfortable with the devices being used at home.

On a laptop you can set things such things like proxies, VPN tunnels, etc. but on an iPad its impossible to force these requirements on the end user. The only choice we had with the iPad was a parent education campaign. At the parent night meetings launching the 1:1 pilots we talked about our district filtering solution, and informed parents that they could use the same system we use at school at home for free.

A couple years ago we switched to OpenDNS for internet filtering and it has been on of the best decisions we've made. I want go into all the details but we went from WedSense, to Lightspeed, and finally switched to OpenDNS. OpenDNS offers a really easy inexpensive and easy to implement solution.

At our parent night meetings we talked about internet filtering and suggested all of our parents use OpenDNS at home. Parents have been genuinely thankful for the information, and we've not had any issues with inappropriate use at home. (UPDATE: Download an OpenDNS at home flyer to hand out to your parents here.)

Additionally, we altered our Internet acceptable use policy to define clearing the web history as inappropriate use. Students and parents were informed that the District Technology department would be doing random checks of web history.

A combination of Parent Education and Policy has proved an easy and effective solution to ensure our students are safe online at home. It didn't cost anything, and was simple to implement. If only everything was that easy.

tags: 181i, 1:1, OpenDNS, iPads, mac
categories: IT
Sunday 01.29.12
Posted by Eric Danley
 

iPad 1:1 — Updating to iOS 5

iOS 5 offers a ton of features that are useful to our 5th grade 1:1 research test and with its release Wednesday we wanted to move quickly to get the update installed on the student iPads. Fortunately, we're just ramping up the test and thus students aren't taking the devices home. I've been through iOS release days before so we scheduled the updates not for Wednesday but Thursday afternoon in order to avoid the download and activation snafus1.

Our iPad test is limited to the two fifth-grade classrooms at one of our seven elementary school (MacBook Airs are being tested at another school) so we only have 2 carts, a total of 50 iPads including 4 spares to update. We let the teachers know in advance that the iPads would be unavailable starting at 2:00 pm and had scheduled until 6 pm to apply the updates. In preparation we downloaded the .ipsw file on one sync station and copied to the other so that we wouldn't be limited by bandwidth issues.

Well, 4 hours was no where near enough time. The update process is as follows:
  1. Click update on the appropriate device in iTunes
    1. An automatic backup begins
    2. iPad firmware is updated
    3. iTunes prompts for backup password to restore data2
    4. Apps are restored
    5. Music & Other content is restored
  2. Start another device
  3. Complete iOS 5 start-up process on iPad3

Per iPad, this process seems to take about 20 minutes and its important to note that no other user initiated activity can take place in iTunes at the same time (automatic syncing still can happen in the background). We had 25 iPads per cart, and fortunately each cart has its own older iMac sync station, and 25 iPads time 20 minutes per iPad equals a heck of a lot more than 4 hours. At about 5:30 we decided to switch to a remote operation, launched Caffeine on the computers and went home to complete the updates through VPN.

Of course we couldn't do the iOS 5 startup process through VPN (it has be done on the device and by hand) so I arrived early in the morning to go iPad by iPad before class started.

Now the carts we have are the not-at-all-cheap Bretford iPad carts bought through Apple and so you would think they would "just work." Sadly, the dock connector cables are too short for the kids to easily attach them and the dock connector is not nearly as easy to connect as the standard Apple cable. The result was about four iPads in one cart that did not receive the updates and about six in the second.

Fortunately, the teachers were not doing anything iOS 5 dependent today so I continued updating iPads up until they were needed and left 5 not-updated for students to use today. I'll finish the rest once they're put away.

Now, we were planning to get all of these devices going on profile manager as well last night but that hit a brick wall due to certificate issues. Apple has recommended a rebuild of the server so that is one of today's projects. Post about that coming later.

--

1. Activation is more of an iPhone concern, but overloaded servers can cause a challenge for App updates and iOS software downloads. My standard recommendation is to wait until the day after a release to apply it.

2. We encrypt backups so that the restore includes passwords for configured accounts like email and calendar.

3. The iOS 5 start-up process asks the user to sign in with their Apple ID, accept the new iOS EULA, send diagnostic information and enable location services. We don't want the students to disable location services or sign in with their personal Apple IDs (yet). Plus, we always want to avoid any interruption of classroom time.

tags: 181i, iOS 5, iPads, updates
categories: IT
Friday 10.14.11
Posted by Eric Danley
 

A New Design and a New Host

The coming death of iWeb has finally pushed me to update my personal domain to a different host. Over the coming weeks I'll be migrating my existing content from the old site, merging all of my other sites with this one and hopefully creating new content.

I debated for quite a while between SquareSpace and flavors.me but just couldn't find a photo to use for my Flavors.me page so SquareSpace won out. I suppose I can recreate the same experience in SquareSpace so it was the better choice anyway.

Wednesday 08.03.11
Posted by Eric Danley
 

Workgroup Manager: Best Practices

Workgroup Manager Icon.pngPart 3 of my 4 part series on Workgroup Manager. We’ve already covered an Introduction to Workgroup Manager, covered the Step by Step Instructions for common tasks. Now we are going to take a look at some best practices that will ensure you maintain and reliable and useful directory system. Also, in case you missed it we also took a quick look at how to add an application to a users dock using WGM.

Workgroup Manager can be a complicated tool, and unfortunately there is potential to create conflicts and instability using this tool. Today, we are going to cover some recommended best practices and take a look at how they can you manage your Open Directory system. Have something to Add? Let me know in the comments.

User ID

Each account record within your directory system is assigned a unique numerical User ID that is used by your directory system to locate individual records. WGM by default simply adds one to the previous record to get the User ID for any new user. It also will not allow you create a duplicate User. But User IDs can be used to keep your directory organized. For Example on my network:

1000-1999 is used with Teachers, Administrators and IT Staff
2000-2999 is used with Kindergartners
3000-3999 is used with 1st Graders
4000-4999 is used with 2nd Graders
5000-5999 is used with 3rd Graders and so on.

By having a simple, unified system for user IDs I can now quickly and easily identify which group a particular user is a part of. This does not replace Workgroups, but it does allow me to know which workgroup I may need to edit or troubleshoot without having to navigate to the Groups pane. Finally, this helps find a quick test account when one is needed.

Naming Practices

Along the same line as user ID, I have found it infinitely helpful to follow a standard naming convention for the computers in all my buildings. This can help during the troubleshooting process to identify a computer in Apple Remote Desktop, assign the right image, or even know which Computer Group to assign to. We use the following format:

Building-ComputerType-Location

For Notebooks that travel we use the users last name to identify the computer instead of the location.

KJHS-eMac-Lab01 (Kennedy Junior High School - eMac - Lab Computer 1)
JHS-MB-Davis (Johnston High School - MacBook - Davis)

Uniform Standards

Because of limits in bandwidth, my District operates 9 separate Directory Systems, one in each building. Although we are moving towards one unified system, I know many other K-12 districts operate in the same way. If you are operating in this type of environment it is important to apply the same unified standards or settings across all of your systems. Not doing so will add significant frustration to the troubleshooting process.

Now, in Educational IT I do recognize that individual schools have individual personalities, and often individual culture. At first glance, this could prove problematic to having a uniform system. However, you can maintain standards such as User ID assignment, group folders, and system preferences without interfering with this culture. Teachers at Clark School may want to use FireFox where teachers at Jones may want to use Safari. This does not interfere with standards such as Energy Saver preferences, file permissions, etc. while still allowing the school to choose their default browser. Complete Standardization is ideal, but not always realistic.

Manage Preferences in One Location

As we took a look at managing preferences in the previous articles, we mentioned the concept of Preference Priority. That User preferences override Workgroup preferences is an example. By definition, we in the IT world are always overworked and busy, and it can often be tempting to take the path of least resistance when assigning preferences. Not paying close attention to where preferences are assigned can and will lead to increased work when trying to troubleshoot what went wrong. It is important that you follow a uniform standard throughout your directory system and only manage preferences in one location.

A good example of this would be dock preferences. In a previous article we discussed a first grade class that had to use the Computer Graphics Lab instead of the regular computer lab for their class. Although the 1st Graders only had Type To Learn and Safari in their dock, the Computer Group had Photoshop in its Dock preferences. The result was confusion for the 1st graders when half of them accidentally clicked on Photoshop instead of Safari by mistake. Instead, you should have managed all dock preferences in workgroups. That way, no matter what computer the user logs in on, they are presented with the same dock.

As a general rule I use the following guidelines:

Hardware related preferences - Manage in the Computer Group
• Energy Saver
• Printers
• Login Options

Software related preferences - Manage in the Workgroup
• Dock Layout
• Default Web Browser
• Application Permissions

Limited Exceptions Only - Manage by the User or Computer

Workgroup Manger can be a very complicated tool, for maintaining your Open Directory systems. However, by following these simple Best Practices you can help alleviate many problems, and provide a much simpler troubleshooting process.

By Eric Danley

Friday 12.03.10
Posted by Eric Danley
 

Workgroup Manager: A Step by Step Guide

Workgroup Manager Icon.png

In Introducing Workgroup Manager we defined common terms, and became familiar with navigating the Workgroup Manager interface. In the second piece in the series on Workgroup Manager I will provide a step by step guide to 3 of the most common Workgroup Manager tasks: Creating a new user, adding a new computer to the directory, and managing preferences. Before continuing on to Workgroup Manager Best Practices, and Basic troubleshooting in parts 3 and 4.

Hit the link for Workgroup Manager: A Step by Step Guide to Common Mac OS X Server Tasks

Creating a New User:

In any modern environment be it a school, non-profit, or enterprise a System Administrator will often find themselves with new clients that need access to the network. Workgroup Manager (WGM) makes it easy to add a new user your Open Directory (OD) database.

1. Connect to Workgroup Manager by launching the WGM application, and entering your directory credentials. Remember, these are typically different than your server admin login and often use the diradmin account. By default, you are presented with the Accounts and Client view.

Workgroup Manager: 10.9.1.16

2. Click the new user button found in the top right side of the toolbar. This will create a new user and allow you to edit their information on the right inspector pane.

3. Enter the account name, and a shortname will automatically be created. If you’d like, you may add additional shortnames or edit the one provided. Next up is the User ID which is the numerical identifier to the account within the database. As will be discussed in the Workgroup Manager: Best Practices article, User IDs are a great way to keep your database organized.

4. Finally, enter your default password in both fields and click save. Thats it! You’ve added a user to your Directory System. That was easy enough, so lets delve into some of the more advanced control you have over accounts. Along the top tab bar in the inspector pane go ahead and click the advanced tab.

WGM: New User Advanced

5. Here you begin to get into the more advanced functionality that WGM offers. What I’d like to highlight for a moment is the “Options…” button below the User Password Type.

WGM: Password Options

6. This is where you can set the password policy for an account. Disabling an account on a specific date is a good security control for a temporary employee, or perhaps a substitute teacher and disabling after a certain number of failed attempts can help defend against a “Bruce Force” attack on an account. More importantly you can set your minimum password policies here with automatic reset prompts, minimum characters, and force a password change on the next login. This last one is particularly useful after first creating an account with the default username and password.

WGM: Groups Assignment

7. The Groups tab is where you set well, any group memberships. This window introduces a different interface dynamic that is repeated throughout the application. By clicking the grey plus beside the other groups table you open a drawer on the side of the WGM window. From here you can drag the necessary groups (Shit & Command click work) into the other groups field to make assignments. The account with inherit all relevant preferences and settings from the assigned groups, but more about that later.

WGM: Create Home

8. The next tab is the “Home” tab, and here is where you can create and assign disk quotas (maximum size of the home) for the accounts home directory. The directories that show up here are those bound to and defined by your open directory system.

9. The next tabs allow you to tie your user account to an OS X “Squirrel Mail” email account if you use that system, and the print quota can set limits to the amount of pages printed per day. Simple and self explanatory.

WGM: Info

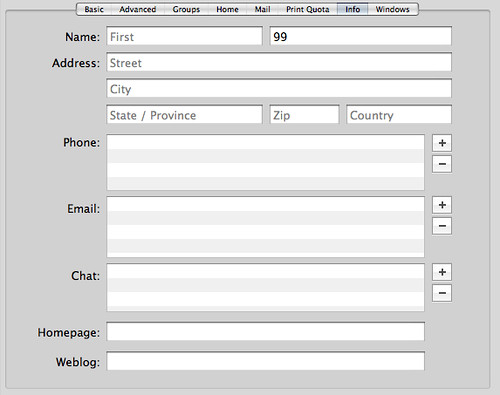
10. The info tab is underutilized in my opinion, and allows you to add a lot of functionality to your OD system. By taking the time to put this information into your directory system you can log into it with Address Book and propagate their address book cards.

11. The last tab is the Windows tab, and it allows you to setup the user account so that it can be accessed from a (cough…) windows box.

Adding a New Computer to the Directory

Although managing your user accounts may be the most obvious use for an Open Directory system and Workgroup Manager, it is certainly not the only use. Arguably managing your computers is just as valuable a feature.

WGM: New Computer

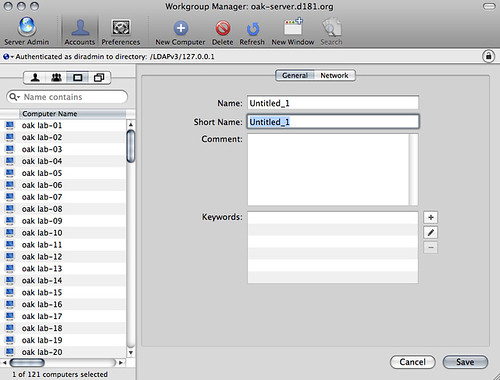
1. There are only two steps required to add a computer to your network. First, if you look at the blue circle with the white plus in the toolbar you should notice that it changed from New User, to New Computer. Go ahead and press it. Then place the name of the computer, and a different short name if you’d like (I don’t find the short name to be a particularly useful feature, but if you’ve got a good use for it let me know in the comments.)

WGM: New Computer - MAC

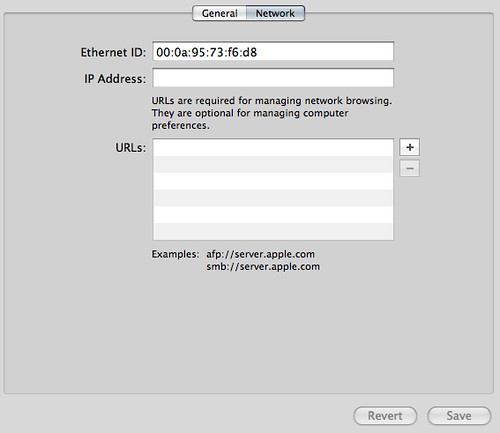
2. The final step is critical when adding a computer to the Open Directory system. Click on the network tab, giving you 3 fields. The ethernet field needs to have the Ethernet ID or MAC Address as this is how the directory system locates and identifies the machine. Note, it sometimes seems counter-intuitive but even if the computer will only be connecting to the network wirelessly, for example a notebook computer, it still must be the Ethernet ID and not the Airport ID. The other fields allow you to control how the computer sees the network, and is optional.

Managing Preferences:

The aspect of Workgroup Manager that will likely consume the largest amount of time is adjusting preferences to control the user experience. With WGM you can do anything from controlling a user’s dock to blocking access to certain applications. It would take a lot more time then I have right now to go over each and every preference so instead we will go over the fundamentals of managing preferences.

The most critical piece of information you need to learn is the priority of preferences, the order of which preferences are applied.


Users > Computers > Computer Group > Workgroups

Users are greater than Computers which are greater than Computer Groups which are greater than Workgroups. This means that if the same preference is managed in multiple places the system will defer to the highest level. For example, lets say all members of the 1st grade workgroup are managed and only have access to Type to Learn and Safari but the regular computer lab is closed for maintenance causing them to use the computer graphics lab instead. The computer graphics computer list is managed so that Adobe Photoshop is on the dock of all computers in the group. Since computer groups get priority over workgroups this means that your workgroup preference saying that 1st graders only get Type To Learn and Safari will be overwritten and the students will see Type To Learn, Safari, and Adobe Photoshop. This could cause confusion for the teacher, and certainly for the students and would not be the best way to handle this situation. Instead, you could have created a Computer Graphics Workgroup and placed the preference to have Photoshop on the dock there.

Another example would be that all groups are managed to limit their access to applications such as Skype, except for lab assistants who are setup with access in their user preferences because it is used to communicate to the tech department. We will look into this concept again in the next article discussion of best practices.

Workgroup Manager: Preferences

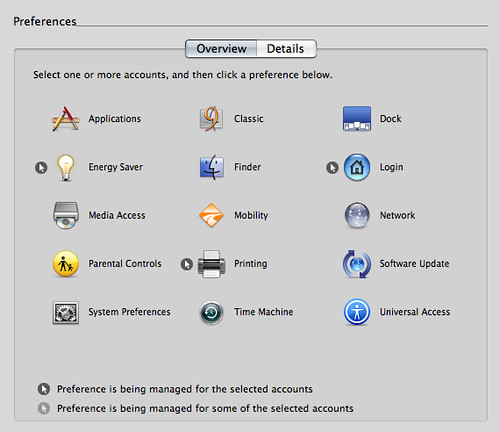
Actually managing preferences is in itself very easy, but it requires thought and planning to control problems such as the one described above. In order to manage any preference you first need to select for what user, group or computer you want to manage. Do this by returning to the left side of the interface, and using the tab bar across the top choose what type of record you want to edit. Once you’ve chosen the record type, chose a specific record from the list on the left. Then across the top toolbar, click on the preferences icon which will bring up the preference pane shown above.

WGM Options

Clicking on each icon will bring up a list of options specific to each preference type. For example, applications will allow you select specific apps to allow or deny the record access to. The “System Preferences” preference does not actually give you access to manage system preferences but allows you to control access to those system preferences by the record type e.g. you could eliminate teachers access to the software update preference, or the network settings. Once you manage a preference, the gray and white mouse icon appears next to the preference as a visual reminder.

The last concept to recognize when managing preferences is the “Never, Once, Always” option. Across the top of each specific preference you have radio buttons with the above options. These control how the preferences are applied. Never of course means that the preference is not managed for that particular record. Once, means that the preference will only be applied upon the records next login and after that access will be returned. This is a great way to add an app to the dock, while still giving the user the ability to remove that item later. Setting the preference to Always means that your settings will always apply and cannot be overridden by the user.

As you can see, managing preferences can be a very complicated endeavor. However with good planning and a firm understanding of the two concepts discussed above you can help reduce any conflicts, and avoid any confusion for the end user.

Be sure to check back next week for my article on Workgroup Manager: Best Practices, and the final article in this series Workgroup Manager: Basic Troubleshooting. Thanks, and be sure to post any questions or comments in the comments section below.

By Eric Danley

Thursday 12.02.10
Posted by Eric Danley
 

Introducing Workgroup Manager

Workgroup Manager Icon.png

In Mac OS X server, Apple provides us with a selection of tools to help us manage our server development. One of the most commonly used tools is Workgroup Manager, a fantastic piece of software, but like many pieces of software WGM can prove daunting. This is the first in a series of articles that will provide a basic understanding of Workgroup Manager, step by step instructions for common tasks, best practices, and basic troubleshooting.

Hit the link for an Introduction to Workgroup Manager.

Apple provides a series of tools with each copy of Mac OS X Server to help you manage and maintain your server. These tools can be found either on the Admin Tools CD included in the Mac OS X Server box or can be downloaded here. For this tutorial I will be focusing on version 10.5 of the admin tools included with Leopard server. If you are not yet running Leopard on your Open Directory Server you can still use these tools as long as you are running server version 10.4.11

Definition of Common Terms:

Workgroup Manager (WGM) - used to manage your Open Directory structure, or more directly, it is used to manage the users, groups, and computers on your network.
User - Anyone who has an account and logs into your network
Group - A collection of users
Workgroup - A collection of users with managed or controlled preferences
Computer - A Mac or PC with managed or controlled preferences
Computer List - A collection of computers with managed or controlled preferences
Open Directory - The database system used on Mac OS X Server to store your user login and preference information

Workgroup Manager Connect

Navigating the Workgroup Manager Interface:

Upon launching WGM you a first asked to log into your Open Directory server. This can be in either DNS or IP format such as my-server.domain.com or 64.233.167.99 If you don’t know the information offhand you can click the browse button to get a list of servers accessible via. bonjour. You will need to provide the login information for your open directory which is typically tied to an account called diradmin. This is not the same admin login information for the server itself, or if it is it shouldn’t be for security reasons. Of course you can choose to store your login information into your keychain, but this should only be done if you are on a secure computer. You wouldn’t want to walk away from your desk, and come back to a student deleting everyone’s login!

Workgroup Manager: 10.9.1.16

Once logged in you get access to the full WGM interface. The interface is a standard Apple server interface with the client account or computer on the rest, with the attributes you are editing on the right. Across the top is your toolbar which like most OS X apps can be modified to your liking.

WGM Toolbar

In the top left corner is the globe on a platter. Clicking this will open the Server Admin application which is used to control and monitor the server services such as Apple File Sharing, DHCPP, DNS, etc. Next up are the Accounts and Preferences panes. These two act as toggle switches to control the interface below. Clicking the Accounts tab gives you access to either the account settings of a particular user/computer or the membership of a Workgroup/Computer List. The preferences button is used to toggle access to well the preference pane. This is where you control the settings of a particular user/group/computer list and will be of particular importance in a school setting.

Continuing across the toolbar is the new user button (which will change to a new group/computer/computer list as appropriate,) and the delete button for removing a character or computer from the directory. Next up is the refresh button which is really only needed if there is more than one person working on the directory system at the same time (a practice I don’t recommend). Finally, we have new window and search. The new window button will open a new window connected to the same directory system. The search window allows for search of your records.

The rest of the interface is divided into two panes, the left would be your record pane, and the right is your inspector pane. Quite simply, you choose the record from the left and edit it on the right. At the top of each of these panes is a tab bar, we’ll hold off on the left tab bar for just a moment and talk about the one on the right one.

The right tab bar is part of the dynamic interface that changes based on the type of record you are editing. Each tab will open up a different part of the record to edit.

WGM Options

Now lets go back to the left tab bar. This tab bar controls the dynamic interface and gives you access to each of the four types of records: User, Group, Computer, Computer List. Clicking on each of these tabs will change the list of records on the left, and change the inspector tab on the right.

The final part of the interface is the preferences tab. When the preference button is pressed on the toolbar, the interface changes to replace the inspector pane with the preference pane. From here you can choose each preference and change or modify the settings for each record.

Next up, step by step directions for common tasks.

By Eric Danley

Wednesday 12.01.10
Posted by Eric Danley
 

Uninstall MySQL on Mac OS X 10.5 Leopard

In an effort to migrate a SMF forum from siteground to my own personal leopard server running on a Mac Mini I managed to install MySQL 5.1 but also completely hose the permissions during the migration process. In the process of creating users for the new MySQL database I lost all access.

However, reinstalling MySQL is not as easy to do as you my think. The following are the standard tactics you might try:


  1. Reinstall the package - FAIL
  2. Delete the package receipt, then reinstall the package - FAIL
  3. Delete the database, and start over from scratch - Psuedo Fail


The MySQL database install with leopard is split in two different locations, both of which are invisible and require root access.

To remove MySQL from Mac OS X perform the following steps:

Open terminal and enter

cd /usr/local/

You will see 1 or more entries that begin with mysql, in my case I had a file called mysql-5.1.32-osx10.5-x86 Remove this file, remember its owned by root so you will need to use sudo

sudo rm -Rv mysql-5.1.32-osx10.5-x86

Put in your admin password and watch as this part of MySQL database is removed. Next we'll removed the shared part of the database. Type the following:

sudo rm -Rv /usr/shared/mysql

After this is done MySQL is completely gone from your system, now you can go ahead and reinstall!

tags: command line, leopard, leopard server, mac, mysql, unix
categories: Macs
Wednesday 03.11.09
Posted by Eric Danley
 

Trying Squarespace

Trying out Squarespace as a new host for EricDanley.com and related sites.

Tuesday 03.10.09
Posted by Eric Danley
 

Powered by Squarespace.